
Creating a simple Chatbot in Salesforce lightning using API.AI in less than 60 mins
In this article, I have explained on how to build your own Chatbot in API.AI and use it in Salesforce lightning.

Bots are awesome, I thought of having my own personal assistant in Salesforce, who could do most common tasks for me based on my inputs in my own way. This could open up millions of opportunities to automate most of the tasks and the best thing is I can chat with my bot the way how I chat with my human assistant (if I have one :)).
In this article, I have explained on how to build your own Chatbot in API.AI and use it in Salesforce lightning. I have built this to greet me, answer some basic questions and opens the screen based on my command. You can see the demo below and the GitHub link of course.

Building Blocks
API.AI — NLP system
Nodejs — Router
Salesforce lightning — UI and the rule engine to act upon the response
API.AI
You can sign-up/sign-in for API.AI here and watch this link to understand more.
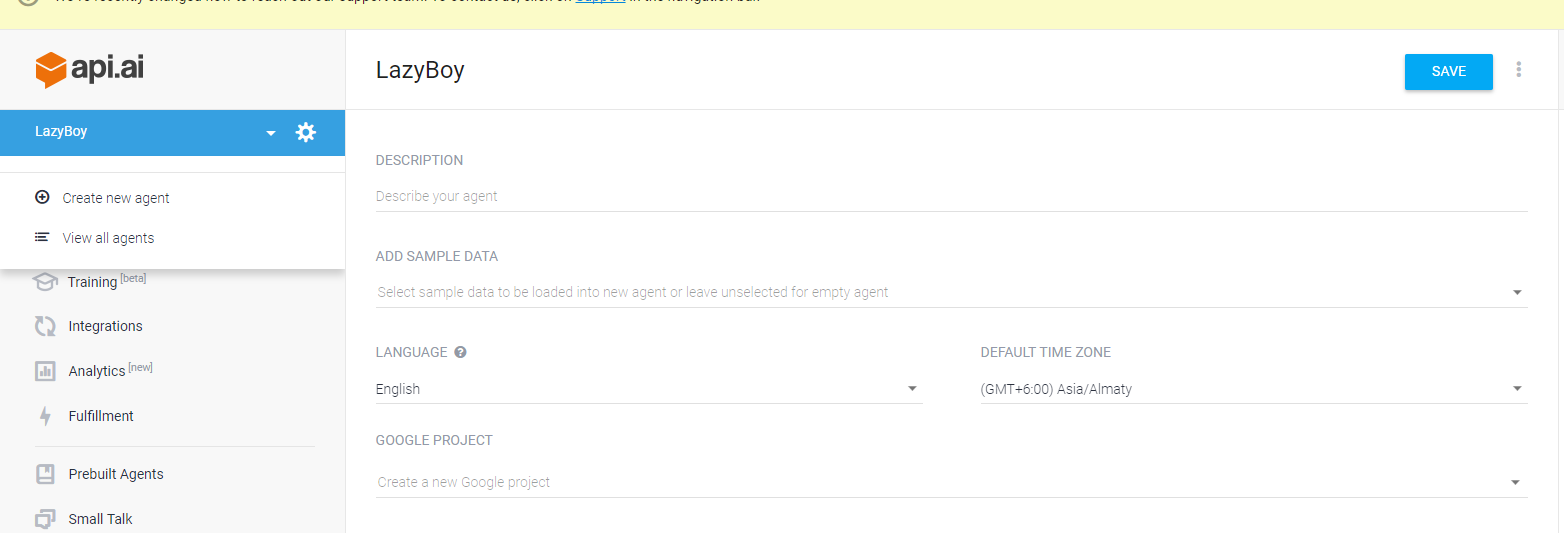
First you need to create an Agent, which is the name of the Bot. I named my Bot as “LazyBoy”, you can add description, Language and other props.
Once the Bot is created, there are 3 major areas which you need to focus on
1. Intents — This is where you will enter the possible user expressions
2. Entities — Objects which will be used in the Intents.
3. Training — This is where you train the Bot with the user expressions, which you/your Bot have not anticipated. You can analyze them and add them to the intents.
Intents:
Intents itself will have different sections, I will talk about the ones which I have used in this demo.
1.Contexts - I have ignored Contexts for this demo and you can learn more here.
2. User says - Here you can have sample user expressions like “can you open lead screen?”, “show me opps?” etc.
3. Action - I have defined a constant here, relevant action for this intent. Example, I have mentioned “OPEN_SCREEN” which I will use it in the client application to decide what should be the action performed.
4. Response - Different possible response for user expression.
Entities: Here you can define different entities and the synonyms, example for entity “Opportunity”, synonyms would be “Opps”, “Opp”, “Opportunities” etc.
Once the Intents, Entities and Actions are defined, you can try out with different user expression to see the result, you could also see the json response which will be used to take action in the client side.
Important properties in JSON response are
action - This will be used in the client to decide what action to be performed.
***actionIncomplete** - This is a flag to check if the user expression is a complete one or not, if there is a mandatory entity which user has not mentioned in the expression the flag will be “true”.*
parameters - This will have the complete parameters list for that intent
2. Nodejs
A very simple nodejs app, to route the request to the API.AI and return the response back to Salesforce. Integration tab in API.AI console has all the different possible integration SDKs. I have used nodejs SDK for this demo. Sample code here.
Why a middle-ware? API.AI comes with set of SDK’s which unfortunately cannot be used in lightning/apex class directly and hence the nodejs app.
You need the below 2 keys to invoke the api.ai from nodejs app,
1. Client access token — you can find this under settings in console
2. SessionId — This is a unique ID for a session, you can hardcode it in nodejs app (for testing purpose), or can pass from Salesforce client.
3. Salesforce lightning
I have created a very simple component, which has one aura:iteration to loop thru the chatlist and one inputText control/component.
And client controller code,
({
    postUserChat: function(component, event, helper) {
        if (event.getParams().keyCode !== 13) {
            return;
        }
        var chatList = component.get("v.chatList");
        var action = component.get("c.postChatText");
        chatList.push({"chatText": component.get("v.userChat"), "userName": 'Me: '});
        action.setParams({"chatText": component.get("v.userChat")});
        component.set("v.userChat", "");
        action.setCallback(this, function(response) {
            var data = JSON.parse(response.getReturnValue());
            chatList.push({"chatText": data.result.fulfillment.speech, "userName": 'Personal Assistant: '});
            component.set("v.chatList", chatList);
            var navigateUrl = "";
            if (!data.result.actionIncomplete && data.result.action === 'OPEN_SCREEN') {
                switch (data.result.parameters.SFObjectEntities) {
                    case 'Opportunity':
                        navigateUrl = "/006/o";
                        break;
                    case 'Lead':
                        navigateUrl = "/00Q/o";
                        break;
                    case 'Task':
                        navigateUrl = "00T/o";
                        break;
                    default:
                        navigateUrl = "";
                        break;
                }
                navigateUrl && $A.get("e.force:navigateToURL").setParams({
                    "url": navigateUrl,
                    "isredirect": false
                }).fire();
            }
        });
        $A.enqueueAction(action);
    }
})
and the apex class to invoke to nodejs service,
public with sharing class HandlerChatBot {
    @AuraEnabled
    public static string postChatText(string chatText) {
        Http http = new Http();
        HttpRequest request = new HttpRequest();
        request.setEndpoint('https://chatbotmiddleware.azurewebsites.net/chat/');
        request.setMethod('POST');
        request.setHeader('Content-Type', 'application/json;charset=UTF-8');
        request.setBody('{"chatText":"' + chatText + '"}');
        HttpResponse response = http.send(request);

        // Parse the JSON response
        if (response.getStatusCode() != 201) {
            System.debug('The status code returned was not expected: ' +
                        response.getStatusCode() + ' ' + response.getStatus());
        } else {
            System.debug(response.getBody());
        }

        return response.getBody();
    }
}
Steps to create an Utility Bar Component:
Navigate to Setup -> Apps -> App Manager
Edit Sales App, which will open up Edit App page
Click on Utility Bar and Click “Add” Utility Bar Items
Select the ChatBot component and Ta-da.
Your chatbot is ready, You can find the entire code base here. Hope this helps!