
RESTful API using Python and Heroku - Step by step guide
I started learning Python a week before and started to try out things on my own. Classes, variables, loops and packages — all the programming stuffs were so cool, but the real challenge was when I started working on building restful service and DEPLOY. I started learning Python a week before and started to try out things on my own. Classes, variables, loops and packages — all the programming stuffs were so cool, but the real challenge was when I started working on building restful service and DEPLOY.

Here is the story — I started learning Python a week before and started to try out things on my own. Classes, variables, loops and packages — all the programming stuffs were so cool, but the real challenge was when I started working on building restful service and DEPLOY.
I will share the step by step procedure I followed, which will eventually make your application land in cloud as mine :)
Python3 and Flask-RESTful:
Assuming that Python and Pip are installed in your machine, lets start by creating a application folder, I call it is python-service-deployment.
Step 1: Virtual Environment:
Virtual environment helps to solve the version conflicts of the packages. All the packages you will be installing for your application will reside inside this virtual environment. If you would like to install a different version of the same package for the other application you are building, yeah you guessed it right, it will reside inside its own virtual environment.
Here is the way to create it, navigate to your working directory in terminal (command prompt in windows) and type the below,
python3 -m venv my-venvThis will create my-venv directory which will contain a copy of python interpreter and supporting files.
To activate the virtual environment on Mac, run:
source my-venv/bin/activateTo activate on Windows, run:
my-venv\scripts\activate.batStep 2: Configure python Interpreter:
My favorite editor is vscode what’s yours :)
Let’s configure vscode to use the python interpreter which is inside my-venv virtual environment.
Open Command Palette from view menu or Command+Shift+P (Ctrl+Shift+P on windows) and type
Python: Select Interpreter
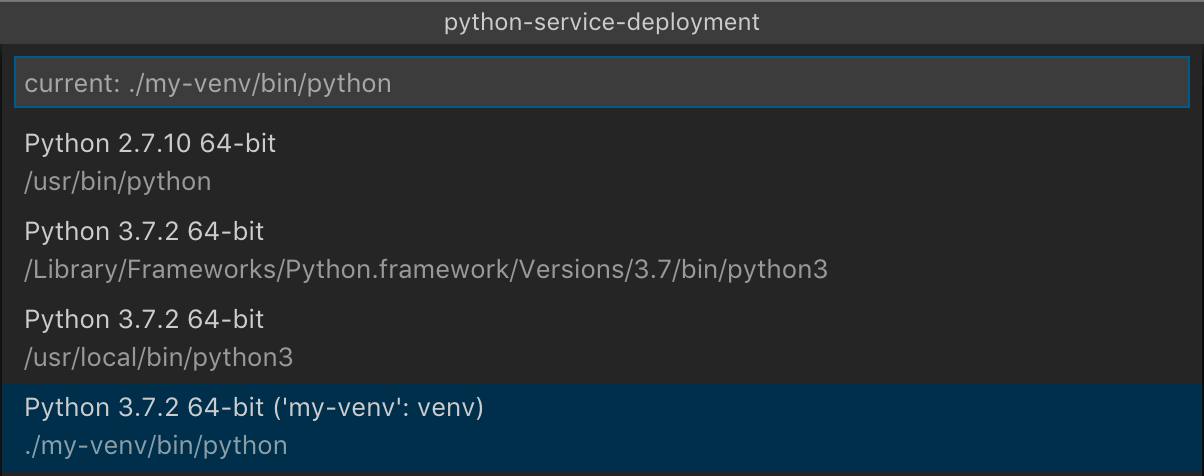
As highlighted above, select the interpreter stored inside the virtual environment, in my case it will be the last one on the list. Now your vscode is ready to interpret your python skills :)
Step 3: Flask-RESTful:
Flask-RESTful is an extension to the micro-framework Flask for building REST APIs. Let’s install it,
pip install flask-restfulThis will install flask-restful and its dependencies inside the virtual environment we created.
Step 4: Build REST API:
A RESTful API uses HTTP requests to GET, PUT, POST and DELETE data.
Let’s jump into code now and start implementing those verbs. I’m trying to create a simple RESTful API which will display the TODO Item based on the id and also it will add new TODO item to the TODO list.
Let’s start by creating todo.py file which will have Todo class and will implement the GET and POST verb. I have placed the todo.py file under resources folder to keep it bit structured.
from flask_restful import Resource

todos = [
    {
        "id": 1,
        "item": "Create sample app",
        "status": "Completed"
    },
    {
        "id": 2,
        "item": "Deploy in Heroku",
        "status": "Open"
    },
    {
        "id": 3,
        "item": "Publish",
        "status": "Open"
    }
]

class Todo(Resource):
    def get(self, id):
        for todo in todos:
            if id == todo["id"]:
                return todo, 200
        return "Item not found for the id: {}".format(id), 404

    def put(self, id):
        for todo in todos:
            if id == todo["id"]:
                todo["item"] = request.form["data"]
                todo["status"] = "Open"
                return todo, 200
        return "Item not found for the id: {}".format(id), 404
If I break the above code,
In the first line, I have imported Resource from flask_restful, this will give access to the HTTP methods like GET, PUT, POST and DELETE.
From line number 3 to 20, its a todos object ideally will reside in a database, but for simplicity I have defined it here.
Interesting things start from line number 21, The class Todo has GET and PUT method defined. When the user requests the URL /Todo/{id}, based on whether it is GET request or PUT the corresponding method will be invoked. But we haven’t defined the routing yet? Yeah. Let’s do that now.
Let’s create app.py file in the root directory,
from flask import Flask
from flask_restful import Api

from resources.todo import Todo

app = Flask(_ _name_ _)
api = Api(app)

api.add_resource(Todo, "/todo/")

if _ _name_ _ == "_ _main_ _":
    app.run()
So here I have imported the required packages, including the Todo class we just created. Also the usual stuffs like wiring up the app and the api.
The routing logic is in line 9. So this has the url pattern “/todo/<id>” will point the request to the Todo class. The request type, the way how it is invoked will parse the “Get” or “Put” method defined in the class Todo. You can try this with any rest client available.
Step 5: Make it Heroku ready and deploy:
Great, now you have built the api, let’s see how we can host.
Install gunicorn, which is a WSGI used to run python application on Heroku.
pip install gunicornNow create Procfile without extension in the application root folder which will help Heroku to understand which piece of your code to run to start the application. Below should be added in our case,
web: gunicorn app:appSet the python version in the runtime.txt file in the root folder.
python-3.6.7Now create the requirements.txt file to list down the dependencies of your application. Execute the below line in the terminal (command prompt in windows).
pip freeze > requirements.txtNow the heroku part, once you have downloaded the heroku cli head to the terminal (command prompt) and login to heroku using the below, which will prompt you to enter your credentials to authenticate your session.
heroku loginOnce you are successfully logged in, then create heroku app, commit and push your changes with the following commands.
heroku create — will create an app in heroku git init — initialize local git repo heroku git:remote -a “remote repo name” — connects to the remote repository git commit -am “initial commit” — commits all the files git push heroku master — pushes the changes to heroku
After the successful deployment, you will be able to test the get method by browsing “https://[heroku domain]/todo/1(https://quiet-refuge-59730.herokuapp.com/todo/1)”
That summarizes what I have done to make it work and if you have come this far, hopefully this helped you as well.
Next I will write about how I’m leveraging aws lambda and api gateway to build restful services in python. Stay tuned.
Entire code for this example can be found here.